
Build a Landing Page in 10 Minutes with Astro and CodeStitch
by Cedar Studios • 10/17/2023
Web Design
Every day it seems there are new tools to build the “perfect” website. At Cedar Studios, we like to keep it simple. That’s why we use a simple static-site generator called Astro. Astro is based in HTML and CSS and ships static code by default. Basically—an unbreakable, future-proof website.
But the fun doesn’t stop there. Let’s see how we can combine Astro with a great new component library—CodeStitch—to make a landing page in 10 minutes.
WARNING
This will be a more technical post. You can view the finished product here.
Tools
Astro: A fast, light-weight web framework that ships static code by default. Also supports React/Svelte/Vue components, server-side rendering, and partially hydrated islands.
CodeStitch: A repository of pure HTML/CSS website components for small business sites. The components are responsive and carefully scoped.
If you’d rather watch than read, here’s a video.
Create an Astro Project
First, we need to create a new Astro project. Launch a terminal and enter:
npm create astro@latest
Name your project and go through the installer. These are the selections we made:
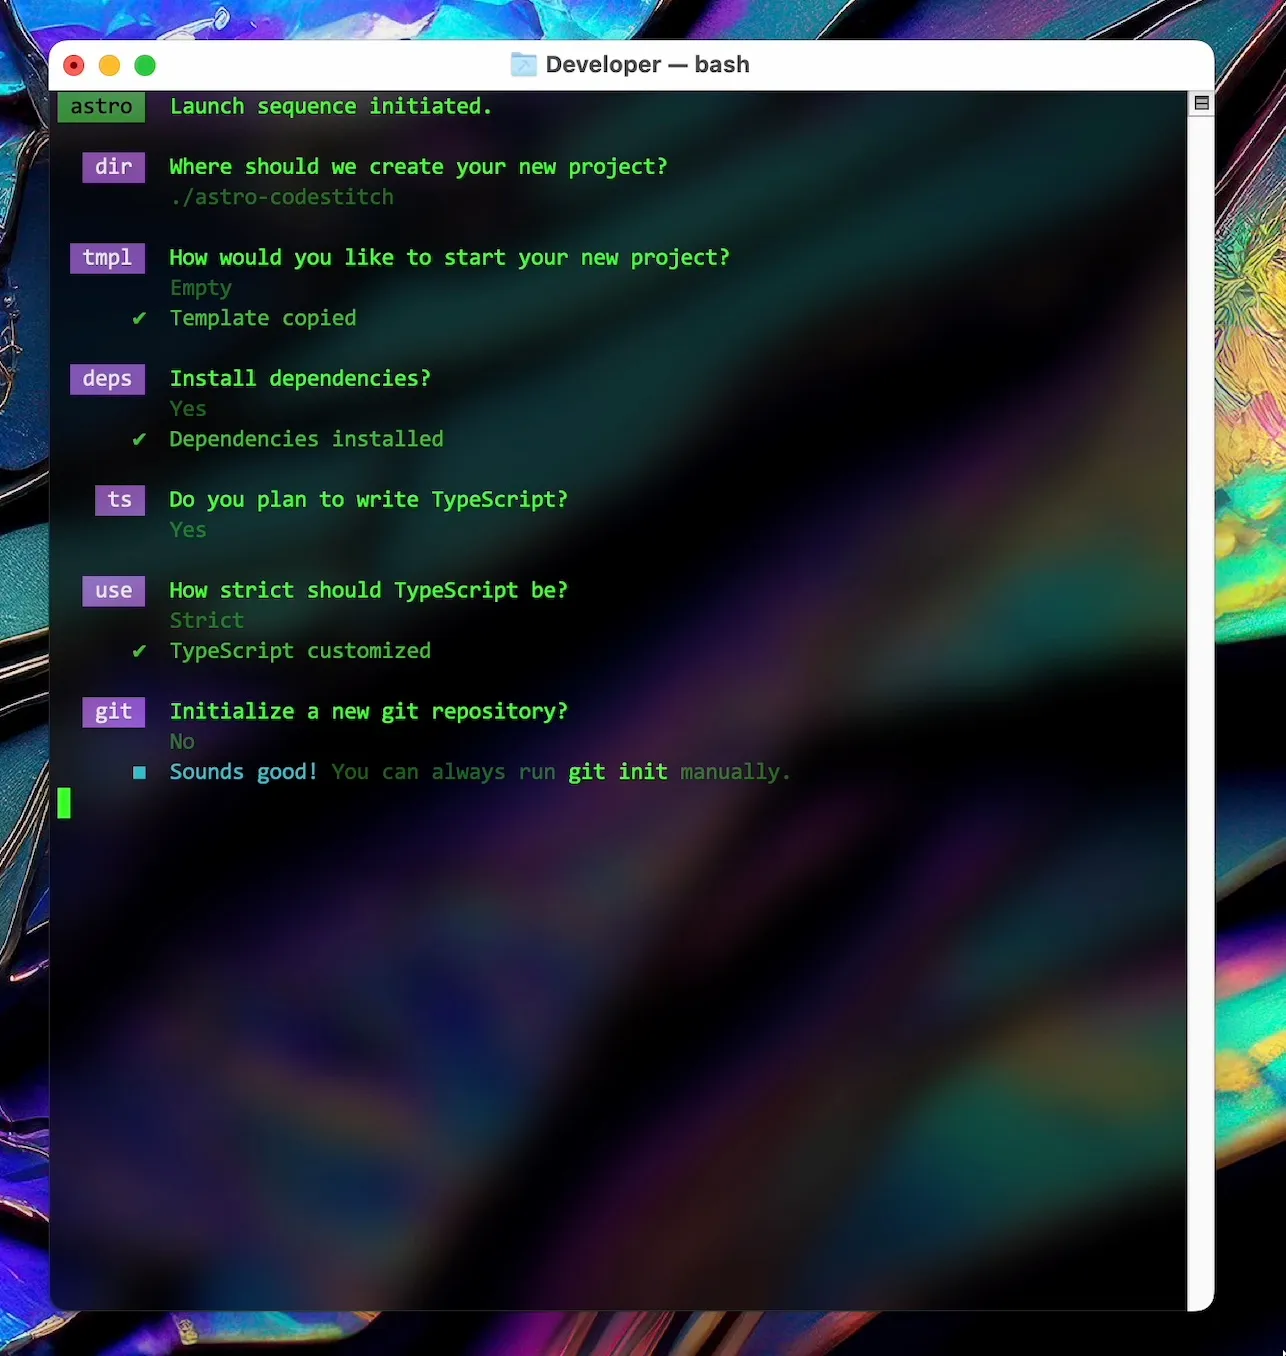
Don't worry, we won't use TypeScript in this tutorial.
When this finishes, open the project in VSCode. You will notice that there are a number of directories and files created by Astro.
Today, we are only interested in the src directory (which contains the code that will be built into a static site), and the pages directory (which contains each web page we want to build).
Within the pages directory, there is an index.astro file that looks like this:
index.astro
---

---

<html lang="en">
  <head>
    <meta charset="utf-8" />
    <link rel="icon" type="image/svg+xml" href="/favicon.svg" />
    <meta name="viewport" content="width=device-width" />
    <meta name="generator" content="{Astro.generator}" />
    <title>Astro</title>
  </head>
  <body>
    <h1>Astro</h1>
  </body>
</html>
Notice that we have some boiler-plate HTML and a simple h1 tag.
TIP
Run npm start to launch a development server and preview the website.
Also notice the YAML-style frontmatter at the top. In here, we can run JavaScript code at build time (or on the server for server-side rendering).
This is a powerful Astro feature that allows us to pull in components from our project, as well as any assets/images or even fetch data from a CMS/API.
So, let’s get started by building a Navbar for the site.
Navbar
CodeStitch has a number of navigation menus available that are both mobile- and desktop-friendly. Let’s choose this one and step into the code.
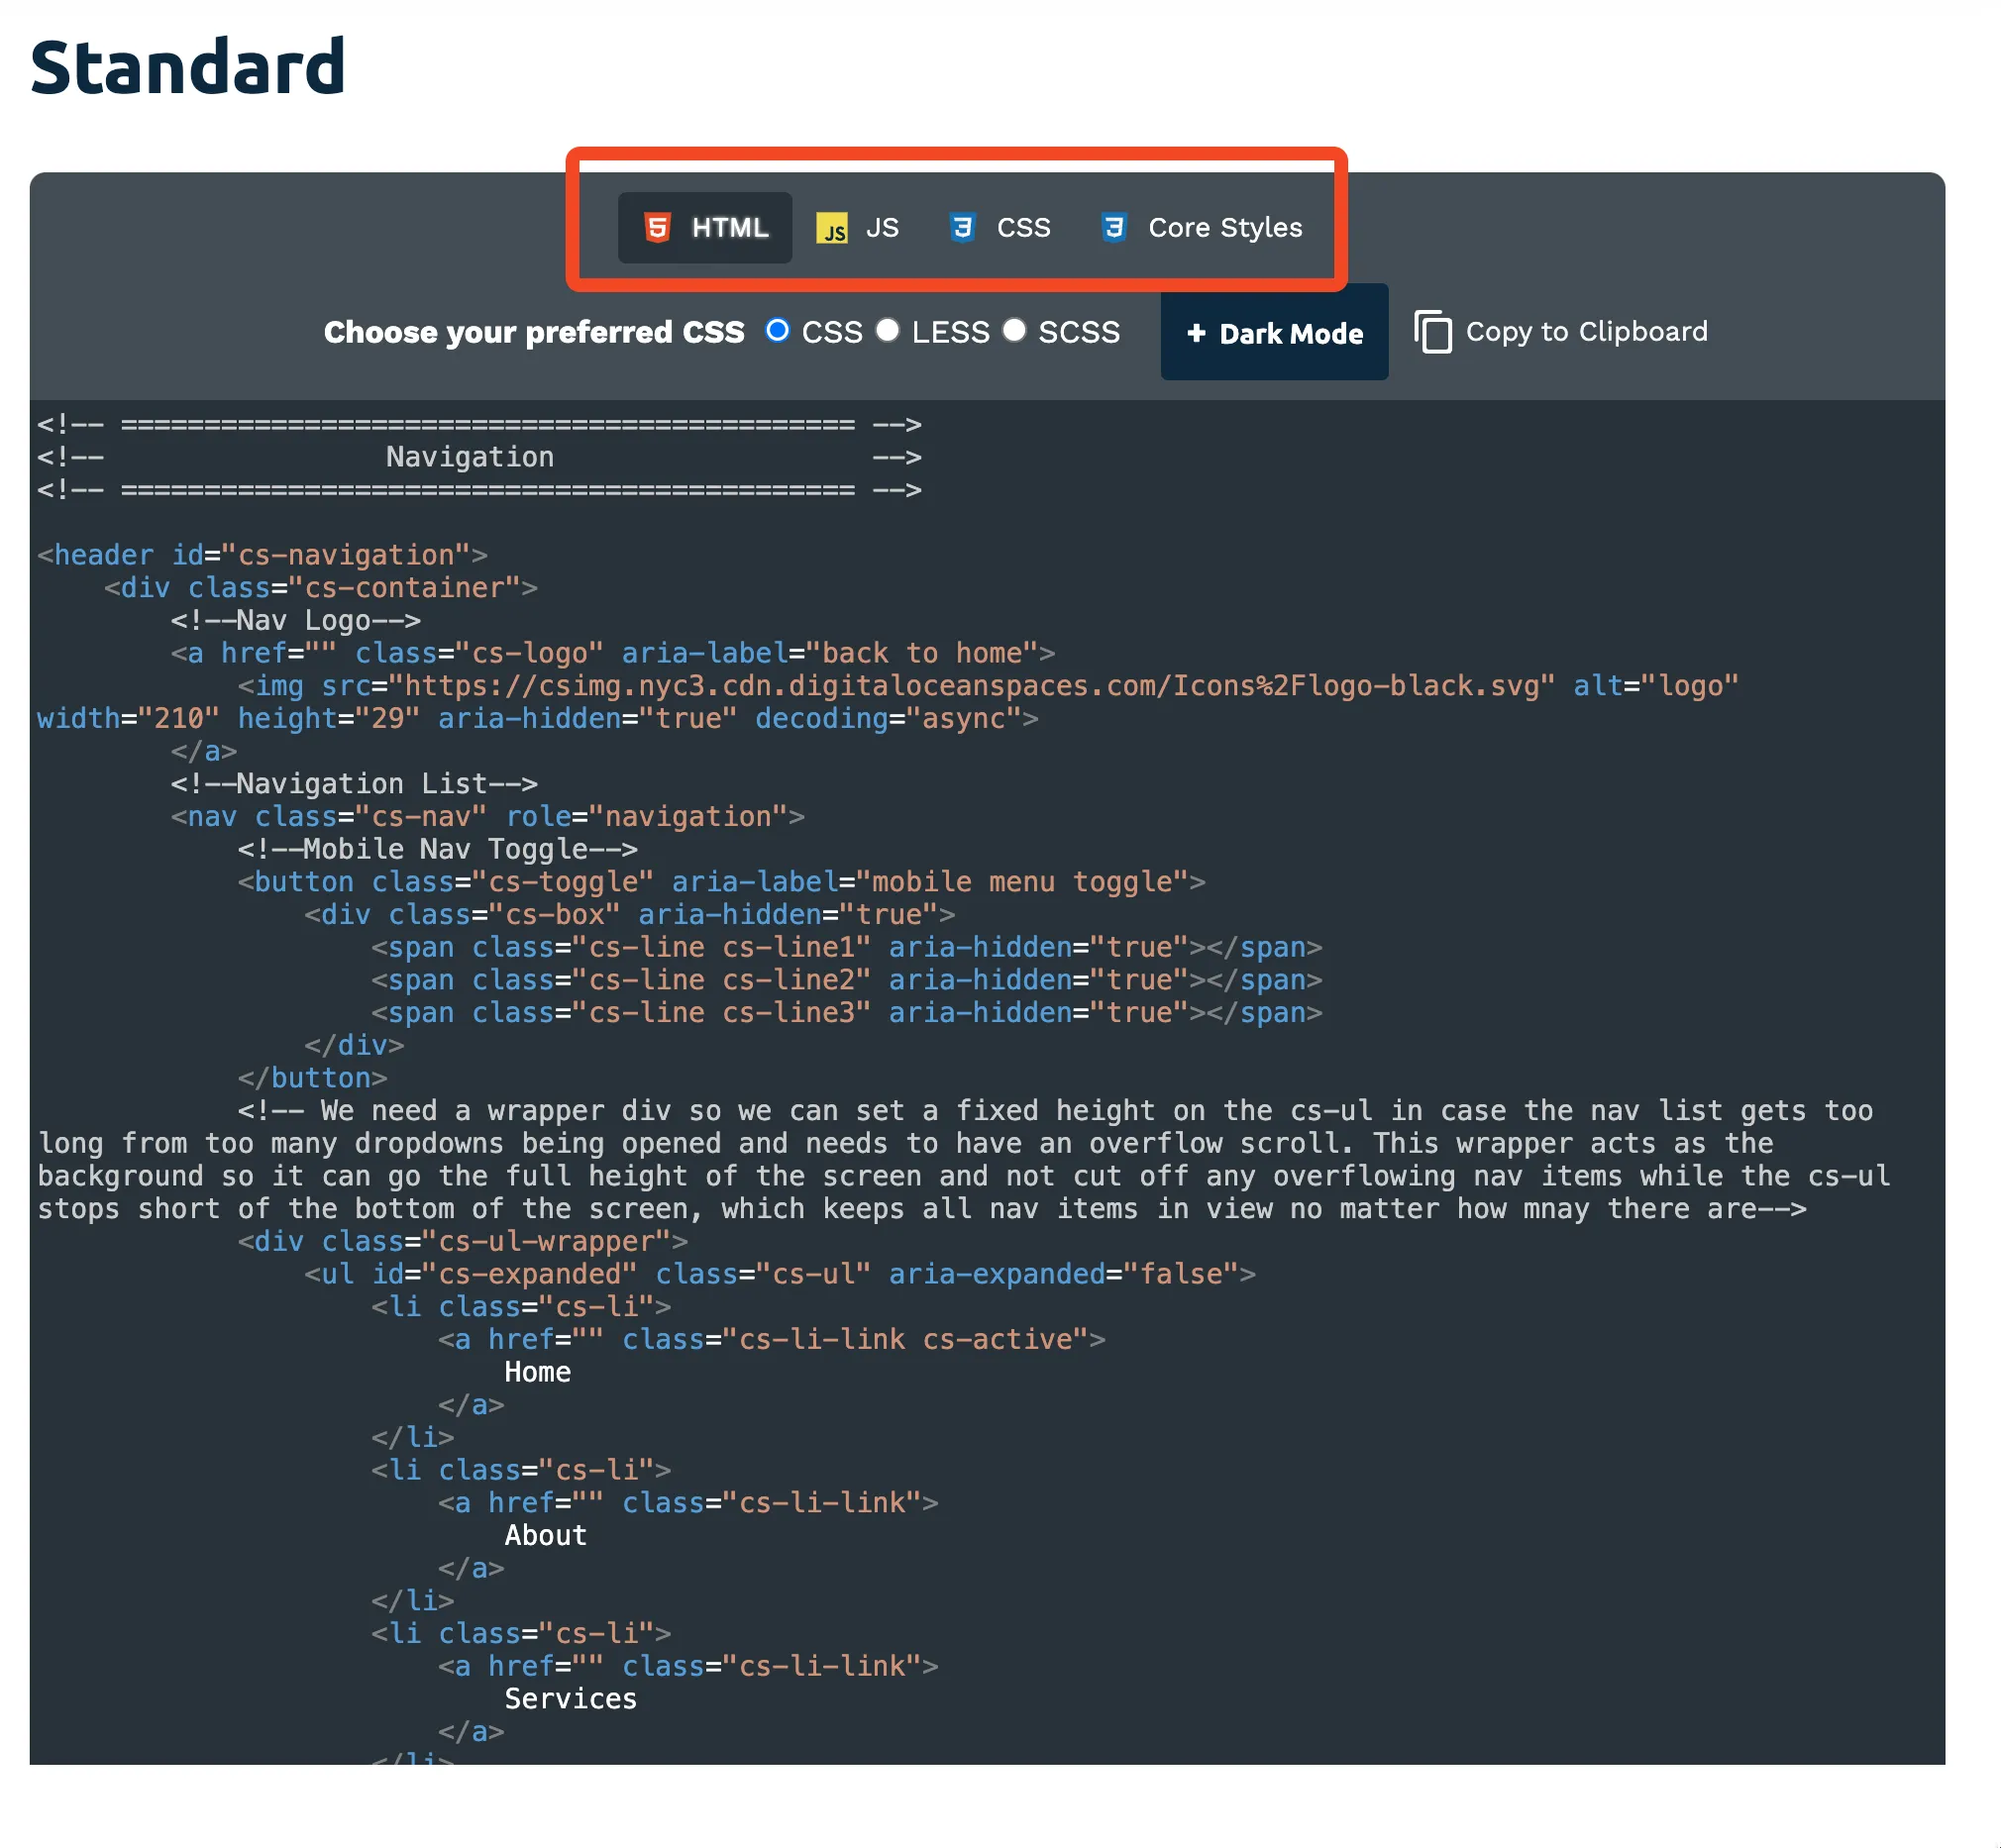
As you can see there are a few files to select at the top.
First is the HTML, which will add the elements (like a logo and nav links) to the website.
Then, there is JavaScript, which will make the mobile menu’s button functional.
Finally, there are two pieces of CSS code—the CSS code applies styles to the Navbar, and the Core Styles code applies some base styles to the entire website, such as fonts and primary colors.
Let’s go ahead and start building our component in a new file.
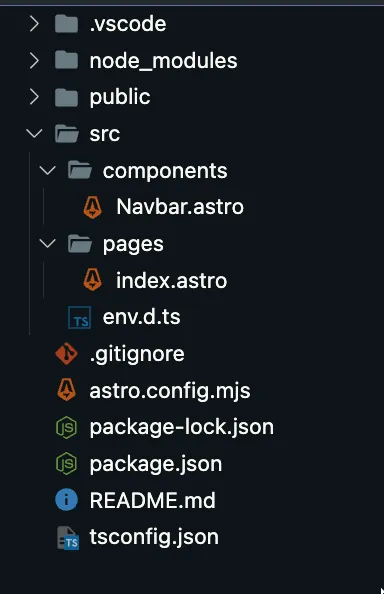
Make a components directory
We’ll make a new directory within src called components, and add a file called Navbar.astro. Your directory should look something like this:
Build the Navbar component
Within the Navbar.astro file, we’re going to copy-paste the HTML, CSS, and JS.
It should look something like this:
Navbar.astro
<!-- CodeStitch HTML code -->
<header id="cs-navigation">
  ...
</header>

<style>
  /* CodeStitch CSS code */
</style>

<script>
  // CodeStitch JS code
</script>
One of Astro’s great features is that these style and script tags are scoped by default. That means that anything we place in the style tag of the Navbar.astro component will not apply to any other component.
CodeStitch already scopes their components by adding identifiers to each section, but Astro offers an extra layer of protection and allows you to safely remove those CodeStitch identifiers if need be.
Import the Navbar component
Now we’re ready to pull the Navbar component into the index.astro file (our landing page).
Remember when I told you that YAML-style frontmatter will run JavaScript at build time? Now we’re going to use it.
Astro will automatically export a .astro file as a reusable component. So let’s import Navbar.astro at the top of index.astro like so:
index.astro
---
import Navbar from "../components/Navbar.astro";
---
Again, this runs when the static site is built, so adding lots of code here will not make the website any slower.
Next, add the Navbar component to the html just like we would with a React component:
index.astro
---
import Navbar from "../components/Navbar.astro";
---

<html lang="en">
	<head>
		<meta charset="utf-8" />
		<link rel="icon" type="image/svg+xml" href="/favicon.svg" />
		<meta name="viewport" content="width=device-width" />
		<meta name="generator" content={Astro.generator} />
		<title>Astro</title>
	</head>
	<body>
		<Navbar />
	</body>
</html>
Finally, we’ll want to add a style tag to this file with our Core Styles CSS that CodeStitch gave us:
index.astro
---
import Navbar from "../components/Navbar.astro";
---

<html lang="en">
	<head>
		<meta charset="utf-8" />
		<link rel="icon" type="image/svg+xml" href="/favicon.svg" />
		<meta name="viewport" content="width=device-width" />
		<meta name="generator" content={Astro.generator} />
		<title>Astro</title>
	</head>
	<body>
		<Navbar />
	</body>
</html>

<style>
	/* Core Styles CSS code */
</style>
Now, if we check the website, we should have a fully functional and styled Navbar.
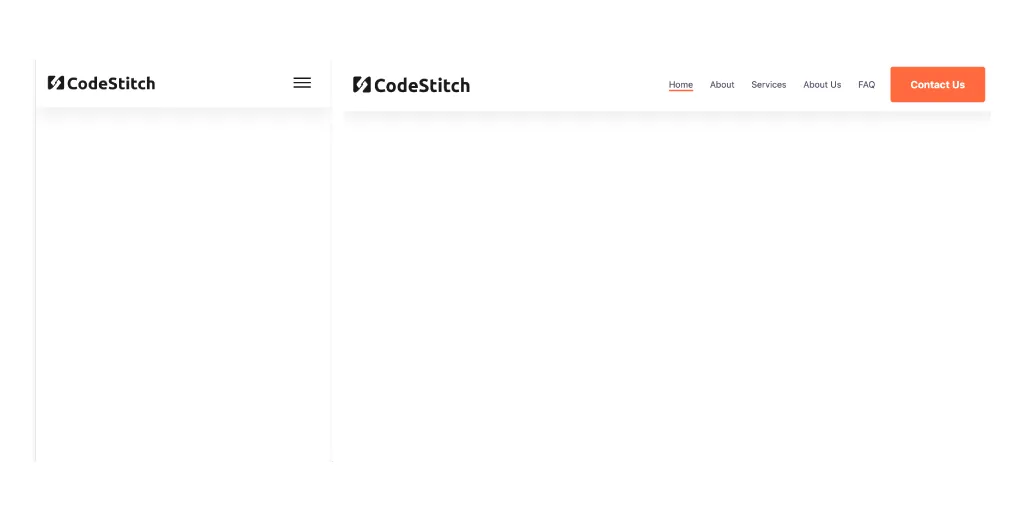
Looks great on mobile and desktop.
Hero Section
Let’s do the same thing with a Hero section. We’ll add a new file—Hero.astro—to the components directory and copy-paste this hero component from CodeStitch.
INFO
This component is not interactive, so there is no JavaScript to copy.
Don’t worry about copying the Core Styles code, we only need to do that once per project.
This code will look similar to the Navbar component:
Hero.astro
---
import Navbar from "../components/Navbar.astro";
---

<!-- CodeStitch HTML code -->
<section id="hero-227">
  ...
</section>

<style>
	/* CodeStitch CSS code */
</style>
Now, import that into index.astro and add the component to the body.
index.astro
---
import Navbar from "../components/Navbar.astro";
import Hero from "../components/Hero.astro";
---

<html lang="en">
	<head>
		<meta charset="utf-8" />
		<link rel="icon" type="image/svg+xml" href="/favicon.svg" />
		<meta name="viewport" content="width=device-width" />
		<meta name="generator" content={Astro.generator} />
		<title>Astro</title>
	</head>
	<body>
		<Navbar />
    <Hero />
	</body>
</html>

<style>
	/* Core Styles CSS code */
</style>
We now have a nice looking Hero section that is grabbing its color for the button and hover fields from our Core Styles in index.astro.

Additional Sections
Below these two components, I added a Side-By-Side, Meet the Team, Pricing, Reviews, Call-To-Action, and Footer component from CodeStitch to the site.
You can view the full website here and see the rest of the code on our Github page.
Conclusion
Building a website with Astro and CodeStitch is fast and easy. Astro lends itself well to component-based architecture and CodeStitch provides beautiful website designs for small businesses.
Our next post in this series will cover some additional Astro tricks like layouts, building additional pages, and using JSX-like syntax right in .astro files themselves.
